Installing Oracle 11gR2 On RHEL6
During my practies on Oracle i decided to install Oracle 11gR2 On OEL 6.4,So follow steps and enjoy it :)
The first Step is Download the zip of Linux on oracle site
Oracle’s Technical Network and downloaded the two Linux x86-64 files for 11.2.0.1.0.unzip linux.x64_11gR2_database_1of2.zip
unzip linux.x64_11gR2_database_2of2.zipThe second Step Prerequisites
Update /etc/sysctl.conf
Open sysctl with command "vi" and scroll to the bottom write the necessaries
vi /etc/sysctl.confkernel.shmall = 2097152kernel.shmmax = 2147483648kernel.shmmni = 4096kernel.sem = 250 32000 100 128net.core.rmem_default = 4194304net.core.rmem_max = 4194304net.core.wmem_default = 262144net.ipv4.ip_local_port_range = 9000 65500fs.file-max = 6815744net.core.wmem_max = 1048576fs.aio-max-nr = 1048576Update /etc/security//limits.conf
vi /etc/security/limits.conforacle soft nproc 2047oracle hard nproc 16384oracle soft nofile 1024oracle hard nofile 65536Add users and groups
On Oracle-base you can see some others group whichs are for grid control
groupadd -g 501 oinstallgroupadd -g 502 dbagroupadd -g 503 operuseradd -u 502 -g oinstall -G dba,oper oracle -p oracleCreate directories and grant permissions
I used my oow directories however you can follow differnts or set like oracle doc.
mkdir /app/oraclemkdir /u01chown -R oracle:oinstall /u01chmod -R 775 /u01chown -R oracle:oinstall /app/oraclechmod -R 775 /app/oracleSwitch to the bkup directorywhich is i create before and setup the permissions there: which is i create before
cd /bkupchown -R oracle:oinstall databasechmod -R 775 databaseSet up the oracle user environment
su oraclevi /home/oracle/.bash_profileexport TMP=/tmpexport TMPDIR=$TMPexport ORACLE_HOSTNAME=************export ORACLE_UNQNAME=********export ORACLE_BASE=/app/oracleexport ORACLE_HOME=$ORACLE_BASE/product/11.2.0/db_1export ORACLE_SID=********export PATH=/usr/sbin:$ORACLE_HOME/bin:$PATHexport LD_LIBRARY_PATH=$ORACLE_HOME/lib:/lib:/usr/lib:/usr/lib64export CLASSPATH=$ORACLE_HOME/jlib:$ORACLE_HOME/rdbms/jlib
AND VERIFY BASH PROFILE WITH FOLLOWING COMMAND
. .bash_profileVerify and/or install specific dependencies
Oracle has a list of dependencies which have to be verified. yum are noted with (*):binutils-2.17.50.0.6
compat-libstdc++-33-3.2.3 (*)
compat-libstdc++-33.3.2.3 (32 bit) (*)
elfutils-libelf-0.125
elfutils-libelf-devel-0.125 (*)
gcc-4.1.2
gcc-c++-4.1.2 (*)
glibc-2.5-24
glibc-2.5-24 (32 bit)
glibc-common-2.5
glibc-devel-2.5
glibc-devel-2.5 (32 bit)
glibc-headers-2.5
ksh-20060214 (*)
libaio-0.3.106
libaio-0.3.106 (32 bit) (*)
libaio-devel-0.3.106
libaio-devel-0.3.106 (32 bit) (*)
libgcc-4.1.2
libgcc-4.1.2 (32 bit)
libgomp-4.1.2
libstdc++-4.1.2
libstdc++-4.1.2 (32 bit)
libstdc++-devel-4.1.2
make-3.81
numactl-devel-0.9.8.i386 (*)
sysstat-7.0.2 (*)
Then proceded with the other dependencies:
yum install unixODBC.x86_64yum install unixODBC-devel.x86_64yum install unixODBC.i686yum install unixODBC-devel.i686Create a recovery area for backups
I create a recovery area (see the screen shots below) on my backup drive with the following:cd /bkupmkdir -p oracle/recovery_areachown -R oracle:oinstall oracleThe third Step is insall oracle
cd /bkup/database./runInstallerThe following are screen shots of all the steps I’ve taken with the graphical installer:

If you wanna to take support from Oracle you have to give your mail address which is you already registered on Oracle Support site.
so I don't fill down Oracle support for this.

At this step we see tree installation options so i wanna create with a configuring database, because i would like to show you how to auto create a database after installation, Also i will show you next post Creating A database using DBCA and manually creating a database.

Here we go, if you are using desktop choose the first, But i'm installing on REDHAT 6 and 40gb and 2gb RAM on Virtualbox :)
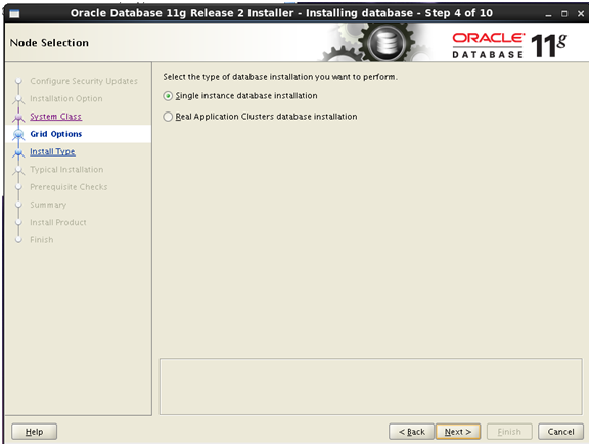
So, if you have RAC system you can follow the second option, But im just installing a single instances.

Typical is the basic optison so i rather go on Advanced install

Choose your own language

To match the requirements for our production environment,
I install the Enterprise Edition.

These steps are show you Oracle base path whichs are you wrote in Bash_profile..

This also a directory for files is OraInventory

If you are on Datawarehouse so go on that to create a database.but i used General

I'm always on name ORCL

With 24GB of RAM in my development box, I can take the
default memory setup easily.

This is where I choose the UTF8
character set

Here we go again, the important thing is security whatever i will ignore :)

So i dont need any database with sample schemas but i recomend to you use it :)

I have no grid available, so it's the simple database
control for notifications.

Our file is system on OS is /u01

Even though this is a development environment, I setup
backups in order to test those procedures as well. This is where I point to the
recovery area I setup above.

Oracle is using, my weak password but it is a strong password none the less (according to many other password
checkers).

I use the groups suggested as setup earlier.

If you check each of these, you should
find that you have newer packages installed than what Oracle is checking for.
Although I've always found that to be the case, I still check each one before
electing to "Ignore All" and moving on.

Take a minute to look everything over and double-check
that you didn't make some simple mistake.
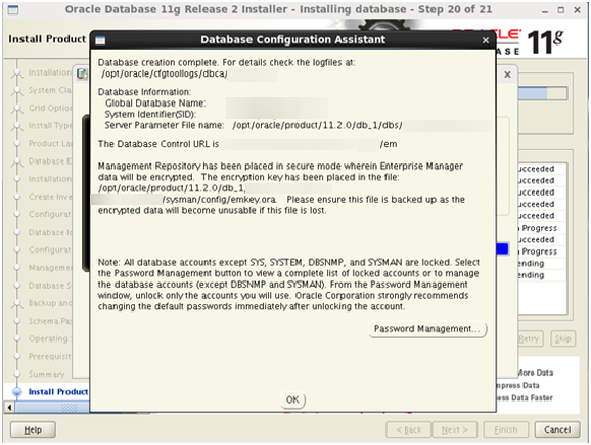
Make note of the URL for the Enterprise Manager and
move on…..almost done!

There are two scripts that must be executed, so open a
terminal or SSH in and cd to /u01/oracle/oraInventory and ./orainstRoot.sh,
then cd /opt/oracle/product/11.2.0/db_1 and ./root.sh. Once these have been
executed, click Ok.

Congratulations! Time to "get back to work!" :)