A Oracle DBA's BLOG

Welcome to my ORACLE DBA blog. You will be Amazing!!!

Thursday, July 4, 2013

ODI11g: Creating and Connecting to ODI Work Repository

This Article present Creating ODI11G: Work repository, At previous post i mention Master Repository So lets Create Work Repository On it.

         Work Repository: Organization and project Repository. Keeping information about working on server or clients. Also Data project and models keeping here.

Step by step Creating Work Repository 

First create ODIW user and give password (for example: "veysi")

SQL> create user ODIW identified by veysi;

Grant dba privile to user

SQL> grant dba to ODIW;

NOTE:  Now remember ODIM user for Master, ETL for System And ODIW user for Work user.


Open the ODI

Log in with Master Repository

Click New(+) and write requisites informations.
Log in Name: Whatever you want
SUPERVISOR:Supervısor and password did you give
USER:Master User(ODIM)
Drive list: Oracle jdbc Drive 
Drive Name: oracle.jdbc.OracleDriver (Connect Oracle  Host JDBC)
URL: Would you like to connect Database jdbc:oracle:thin:@ 

You can Test Your Connection and Click Ok 


Click Ok

Now its ready for doing Any job. Click Work Repository


You will see the Master Repository connection information. Click Next

Write ID between 1-998 and write name(whatever you want)  Choose Work repository Development and Click Finish


ODI is creating your work

Click Yes

Choose created work click Ok

 It Now Ready you can test it and click ok


Now have a nice work :)


ODI11g: Creating and Connecting to ODI Master Repository


Today I'll preset ODI Creating Master Repository, During My practice at OraTech i used to ODI
So what does it mean Repository? Repository is data center of ODI that keep all of works. We need a Master repository and "n" Work Repository before we have started.

Master Repository: Keep information of installation and Sources, Targets,Security and version. On every project should be at less one Master repository or sometime more than one.
        ETL: E-LT(Extract-Load & Transform ) Data  transformation and integration . Etl takes  data's from source system to Data warehouse. 


Step by Step creating Master Repository

1. Create prerequisite users..
Create “ETL” user and password. (for example”veysi”)

SQL> create user ETL identified by veysi;

Give ETL user DBA privilege.

SQL> grant dba to ETL;

Create “ODIM” user and password. (for example:”veysi”)

SQL> create user ODIM identified by veysi;

Give ODIM user DBA privilege

SQL> grant dba to ODIM;

So,Lets start. first keep going on path and run ./odi.sh


Its Opening


Click File>New

Choose Master Repository Creation and click OK

Technology: Default Oracle  (Master Repositori host)

JDBC Driver: oracle.jdbc.OracleDriver (Oracle connect to Host JDBC)

JDBC URL: jdbc:oracle:thin:@ (Connection to Oracle  database  Host,post and Sid information)
Note: Host and  sid could known by using V$instance parameter.

USER: ODIM (Master Repository  user)

Password: veysi (ODIM user password)

DBA USER: ETL (system user)

Password: veysi (ETL password)


NOTE: ID should be different with others  Master Repository ID

Click Test Connection and test your connection
So, Mine was successfully :)

Give Supervisor Password and click next

Choose Internal Password Storage and Click finish

Master Repository is creating, wait for a while :)

So that was Successful
Now You can login and create Any work Repository for projects.

Next Post is Work Repository just keep following ;)

Wednesday, July 3, 2013

Installing Oracle Data Integrator

I have started an professional internship program. 
i installed Oracle Data integrator, Created ODI Work Repository  and ODI Master Repository. 

Now I'm going to present How to install Oracle Data Integrator 11.1.1.6.0 on windows 32 bit system.

First make sure your database already installed.
Go to Oracle site and download ODI Here   

Then Unzip your downloaded folders.

Note: Download Oracle JDK package and install it in order to During installation if you don't want to get error of Oracle Java JDK package.

1. Open Disk1 folder at unzipped file.
run setup.exe as administrator 


So, i got this Error. Install JDK and run again.


Now its Starting 

The Welcome page Click Next.

If you would like to Get Oracle support for Upgrade write your E-mail address but now i don't need it choose Skip .. and Click Next

For Now choose Developer and Standalone Installation for targets and sources.. Click Next


The ODI checking for Prerequisite. Click Next
Choose your Oracle Home directory and Click Next


I wanted to create my self Repositories (Master and Work) that's why i Skip it. Click Next

Write Agent Name and Port but Agent Port must be 0 - 65535, So, i wrote AgentODI and 20910 Click Next


Windows asking for firewall just Click Allow access and click Next

Again asking for Oracle Security Support for Now i don't need any support, Click Next

Click Yes

Now You can save the summary what have you done. Then Click Install
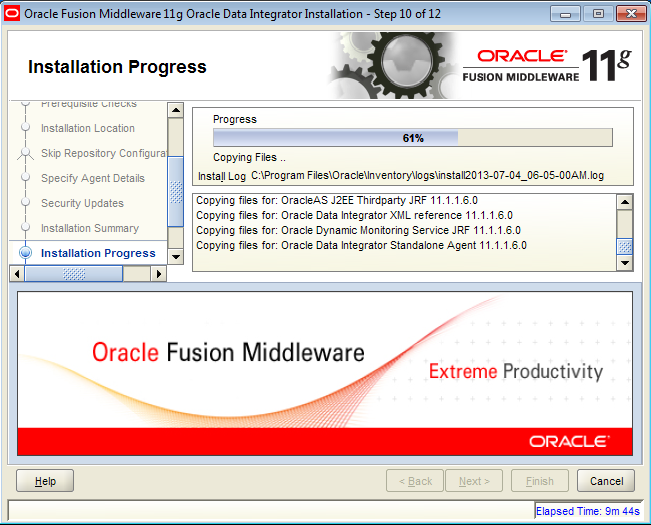
ODI is going to installing.
So it was successfully installed and Configured Automatically Click Next

Installation Completed Again you can save summary and Click Finish...

Now start it by following command

$ cd /u01/app/oracle/product/11.2.0/ODIAgent/oracledi/agent/bin/

$ ./odiparams.sh

$ ./agent_Agent001.sh

Monday, June 10, 2013

Renaming an Oracle database 11G

This article presents Renaming Database Name
So, Sometime we need to change Database name, Actually its uncommon issue however again its importat for us. There are two methots
Lets begin step by step.

1. First methot Renaming Database Name

First lets look at our database_name will be renamed.
SQL> select name from v$database;

 NAME

---------
ORCL

1.Close your database

SQL> shu immediate
Database closed.
Database dismounted.
ORACLE instance shut down.

2.Make database mounted

SQL> startup mount
ORACLE instance started.
Total System Global Area 1121554432 bytes
Fixed Size 1336008 bytes
Variable Size 889195832 bytes
Database Buffers 218103808 bytes
Redo Buffers 12918784 bytes
Database mounted.

SQL> exit
Disconnected from Oracle Database 11g Enterprise Edition Release 11.2.0.1.0 - Production
With the Partitioning, Automatic Storage Management, OLAP, Data Mining
and Real Application Testing options
Write new dbname

[oracle@mhm /]$ nid target=sys/Oracle_4u@ORCL dbname=TEST_ORCL
DBNEWID: Release 11.2.0.1.0 - Production on Sun Oct 23 22:34:28 2011
Copyright (c) 1982, 2009, Oracle and/or its affiliates. All rights reserved.
Connected to database ORCL (DBID=1272787738)
Connected to server version 11.2.0
Control Files in database:
+DATA/orcl/controlfile/current.260.745007003
+FRA/orcl/controlfile/current.256.745007003
Change database ID and database name ORCL to TEST_ORCL? (Y/[N]) => Y

Go to SQL*plus with SYS User
And set new database name

SQL> ALTER SYSTEM SET DB_NAME=test_orcl SCOPE=SPFILE;

Cloese database

SQL> shu abort;
Now create new password

 [oracle@mhm /]$ orapwd file=/u01/app/oracle/product/11.2.0/dbhome_1/dbs/pwdtest_orcl.ora
password=password entries=10

Create pfile from spifle

SQL>sqlplus / as sysdba
SQL>create pfile=’inittest_orcl.ora’ from spfile;

Open the initnew.ora and change the DBNAME as new
Again cloese the database.

SQL> Shutdown immediate;

Now export new name

oracle@mhm /]$ ORACLE_SID=test_orcl
oracle@mhm /]$ export ORACLE_SID

Now for TNS and Listener to be know new database Lsnrtl reloaded

Lsnrctl reload
And now open Database at Resetlogs;

SQL> startup mount;
SQL> alter database open resetlogs;

You finished so check your new database name.

SQL> select name from v$database;

 NAME

---------


TEST_ORCL

2.Second methot renaming database


SQL> select name from v$database; NAME

---------

ORCL

Now backup control file as a trace.

SQL> Alter database backup controlfile to trace;
Save the trace as script .

[oracle@orcl ~]$ mv orcl_ora_2884.trc back_cntrl_script.sql
Now open the script and delete until.

STARTUP NOMOUNT
CREATE CONTROLFILE REUSE DATABASE “ORCL” RESETLOGS NOARCHIVELOG
Now change “REUSE” to “SET” and write new database name.

CREATE CONTROLFILE SET DATABASE “TEST_ORCL” RESETLOGS NOARCHIVELOG

And delete the

RECOVER DATABASE USING BACKUP CONTROLFILE;
Your script should be like following
STARTUP NOMOUNT

CREATE CONTROLFILE SET DATABASE "TEST_ORCL" RESETLOGS  NOARCHIVELOG

    MAXLOGFILES 16

    MAXLOGMEMBERS 3

    MAXDATAFILES 100

    MAXINSTANCES 8

    MAXLOGHISTORY 292

LOGFILE

  GROUP 1 '/oracle/ora11g/oradata/redo01.log'  SIZE 50M BLOCKSIZE 512,

  GROUP 2 '/oracle/ora11g/ oradata/redo02.log'  SIZE 50M BLOCKSIZE 512,

  GROUP 3 '/oracle/ora11g/ oradata/redo03.log'  SIZE 50M BLOCKSIZE 512,

DATAFILE

  '/oracle/ora11g/oradata/system01.dbf',

  '/oracle/ora11g/oradata/sysaux01.dbf',

  '/oracle/ora11g/oradata/undotbs01.dbf',

  '/oracle/ora11g/oradata/users01.dbf',

  '/oracle/ora11g/oradata/example01.dbf',

  '/oracle/ora11g/oradata/myts01.dbf'

CHARACTER SET WE8ISO8859P9

;

ALTER DATABASE OPEN RESETLOGS;

ALTER TABLESPACE TEMP ADD TEMPFILE '/oracle/ora11g/oradata/temp01.dbf'

     SIZE 441450496  REUSE AUTOEXTEND ON NEXT 655360  MAXSIZE 32767M;

 Shutdown your database;

SQL> shutdown immediate;

Backup your  init<SID>.ora and open it, change  db_name, instance_name parameters as a new database_name save it.

Now run the script (back_cntrl_script.sql)

SQL> @/oracle/ back_cntrl_script.sql

You finished it Now check your new database name

SQL> SELECT NAME FROM V$DATABASE;

SQL> select name from v$database;

 NAME

---------


TEST_ORCL