A Oracle DBA's BLOG

Welcome to my ORACLE DBA blog. You will be Amazing!!!

Monday, June 10, 2013

Renaming an Oracle database 11G

This article presents Renaming Database Name
So, Sometime we need to change Database name, Actually its uncommon issue however again its importat for us. There are two methots
Lets begin step by step.

1. First methot Renaming Database Name

First lets look at our database_name will be renamed.
SQL> select name from v$database;

 NAME

---------
ORCL

1.Close your database

SQL> shu immediate
Database closed.
Database dismounted.
ORACLE instance shut down.

2.Make database mounted

SQL> startup mount
ORACLE instance started.
Total System Global Area 1121554432 bytes
Fixed Size 1336008 bytes
Variable Size 889195832 bytes
Database Buffers 218103808 bytes
Redo Buffers 12918784 bytes
Database mounted.

SQL> exit
Disconnected from Oracle Database 11g Enterprise Edition Release 11.2.0.1.0 - Production
With the Partitioning, Automatic Storage Management, OLAP, Data Mining
and Real Application Testing options
Write new dbname

[oracle@mhm /]$ nid target=sys/Oracle_4u@ORCL dbname=TEST_ORCL
DBNEWID: Release 11.2.0.1.0 - Production on Sun Oct 23 22:34:28 2011
Copyright (c) 1982, 2009, Oracle and/or its affiliates. All rights reserved.
Connected to database ORCL (DBID=1272787738)
Connected to server version 11.2.0
Control Files in database:
+DATA/orcl/controlfile/current.260.745007003
+FRA/orcl/controlfile/current.256.745007003
Change database ID and database name ORCL to TEST_ORCL? (Y/[N]) => Y

Go to SQL*plus with SYS User
And set new database name

SQL> ALTER SYSTEM SET DB_NAME=test_orcl SCOPE=SPFILE;

Cloese database

SQL> shu abort;
Now create new password

 [oracle@mhm /]$ orapwd file=/u01/app/oracle/product/11.2.0/dbhome_1/dbs/pwdtest_orcl.ora
password=password entries=10

Create pfile from spifle

SQL>sqlplus / as sysdba
SQL>create pfile=’inittest_orcl.ora’ from spfile;

Open the initnew.ora and change the DBNAME as new
Again cloese the database.

SQL> Shutdown immediate;

Now export new name

oracle@mhm /]$ ORACLE_SID=test_orcl
oracle@mhm /]$ export ORACLE_SID

Now for TNS and Listener to be know new database Lsnrtl reloaded

Lsnrctl reload
And now open Database at Resetlogs;

SQL> startup mount;
SQL> alter database open resetlogs;

You finished so check your new database name.

SQL> select name from v$database;

 NAME

---------


TEST_ORCL

2.Second methot renaming database


SQL> select name from v$database; NAME

---------

ORCL

Now backup control file as a trace.

SQL> Alter database backup controlfile to trace;
Save the trace as script .

[oracle@orcl ~]$ mv orcl_ora_2884.trc back_cntrl_script.sql
Now open the script and delete until.

STARTUP NOMOUNT
CREATE CONTROLFILE REUSE DATABASE “ORCL” RESETLOGS NOARCHIVELOG
Now change “REUSE” to “SET” and write new database name.

CREATE CONTROLFILE SET DATABASE “TEST_ORCL” RESETLOGS NOARCHIVELOG

And delete the

RECOVER DATABASE USING BACKUP CONTROLFILE;
Your script should be like following
STARTUP NOMOUNT

CREATE CONTROLFILE SET DATABASE "TEST_ORCL" RESETLOGS  NOARCHIVELOG

    MAXLOGFILES 16

    MAXLOGMEMBERS 3

    MAXDATAFILES 100

    MAXINSTANCES 8

    MAXLOGHISTORY 292

LOGFILE

  GROUP 1 '/oracle/ora11g/oradata/redo01.log'  SIZE 50M BLOCKSIZE 512,

  GROUP 2 '/oracle/ora11g/ oradata/redo02.log'  SIZE 50M BLOCKSIZE 512,

  GROUP 3 '/oracle/ora11g/ oradata/redo03.log'  SIZE 50M BLOCKSIZE 512,

DATAFILE

  '/oracle/ora11g/oradata/system01.dbf',

  '/oracle/ora11g/oradata/sysaux01.dbf',

  '/oracle/ora11g/oradata/undotbs01.dbf',

  '/oracle/ora11g/oradata/users01.dbf',

  '/oracle/ora11g/oradata/example01.dbf',

  '/oracle/ora11g/oradata/myts01.dbf'

CHARACTER SET WE8ISO8859P9

;

ALTER DATABASE OPEN RESETLOGS;

ALTER TABLESPACE TEMP ADD TEMPFILE '/oracle/ora11g/oradata/temp01.dbf'

     SIZE 441450496  REUSE AUTOEXTEND ON NEXT 655360  MAXSIZE 32767M;

 Shutdown your database;

SQL> shutdown immediate;

Backup your  init<SID>.ora and open it, change  db_name, instance_name parameters as a new database_name save it.

Now run the script (back_cntrl_script.sql)

SQL> @/oracle/ back_cntrl_script.sql

You finished it Now check your new database name

SQL> SELECT NAME FROM V$DATABASE;

SQL> select name from v$database;

 NAME

---------


TEST_ORCL


Thursday, March 21, 2013

Step by step installing Oracle 11gR2 On Redhat 6

Installing Oracle 11gR2 On RHEL6

During my practies on Oracle i decided to install Oracle 11gR2 On OEL 6.4,
So follow steps and enjoy it :)

The first Step is Download the zip of Linux on oracle site

Oracle’s Technical Network  and downloaded the two Linux x86-64 files for 11.2.0.1.0.
unzip linux.x64_11gR2_database_1of2.zip
unzip linux.x64_11gR2_database_2of2.zip

The second Step Prerequisites

Update /etc/sysctl.conf 

Open sysctl with command "vi" and scroll to the bottom write the necessaries
vi /etc/sysctl.conf


kernel.shmall = 2097152
kernel.shmmax = 2147483648
kernel.shmmni = 4096
kernel.sem = 250 32000 100 128
net.core.rmem_default = 4194304
net.core.rmem_max = 4194304
net.core.wmem_default = 262144
net.ipv4.ip_local_port_range = 9000 65500
fs.file-max = 6815744
net.core.wmem_max = 1048576
fs.aio-max-nr = 1048576

Update /etc/security//limits.conf

vi /etc/security/limits.conf

oracle soft nproc 2047
oracle hard nproc 16384
oracle soft nofile 1024
oracle hard nofile 65536

Add users and groups

On Oracle-base you can see some others group whichs are for grid control

The following needed to be added:
groupadd -g 501 oinstall
groupadd -g 502 dba
groupadd -g 503 oper
useradd -u 502 -g oinstall -G dba,oper oracle -p oracle

Create directories and grant permissions

I used my oow directories however you can follow differnts or set like oracle doc.
mkdir /app/oracle
mkdir /u01
chown -R oracle:oinstall /u01
chmod -R 775 /u01
chown -R oracle:oinstall /app/oracle
chmod -R 775 /app/oracle

Switch to the bkup directorywhich is i create before and setup the permissions there: which is i create before
cd /bkup
chown -R oracle:oinstall database
chmod -R 775 database

Set up the oracle user environment

su oracle
vi /home/oracle/.bash_profile


export TMP=/tmp
export TMPDIR=$TMP
export ORACLE_HOSTNAME=************
export ORACLE_UNQNAME=********
export ORACLE_BASE=/app/oracle
export ORACLE_HOME=$ORACLE_BASE/product/11.2.0/db_1
export ORACLE_SID=********
export PATH=/usr/sbin:$ORACLE_HOME/bin:$PATH
export LD_LIBRARY_PATH=$ORACLE_HOME/lib:/lib:/usr/lib:/usr/lib64
export CLASSPATH=$ORACLE_HOME/jlib:$ORACLE_HOME/rdbms/jlib


AND VERIFY BASH PROFILE WITH FOLLOWING COMMAND

. .bash_profile

Verify and/or install specific dependencies

Oracle has a list of dependencies which have to be verified.  yum are noted with (*):
binutils-2.17.50.0.6
compat-libstdc++-33-3.2.3 (*)
compat-libstdc++-33.3.2.3 (32 bit) (*)
elfutils-libelf-0.125
elfutils-libelf-devel-0.125 (*)
gcc-4.1.2
gcc-c++-4.1.2 (*)
glibc-2.5-24
glibc-2.5-24 (32 bit)
glibc-common-2.5
glibc-devel-2.5
glibc-devel-2.5 (32 bit)
glibc-headers-2.5
ksh-20060214 (*)
libaio-0.3.106
libaio-0.3.106 (32 bit) (*)
libaio-devel-0.3.106
libaio-devel-0.3.106 (32 bit) (*)
libgcc-4.1.2
libgcc-4.1.2 (32 bit)
libgomp-4.1.2
libstdc++-4.1.2
libstdc++-4.1.2 (32 bit)
libstdc++-devel-4.1.2
make-3.81
numactl-devel-0.9.8.i386 (*)
sysstat-7.0.2 (*)

Then proceded with the other dependencies:
yum install unixODBC.x86_64
yum install unixODBC-devel.x86_64
yum install unixODBC.i686
yum install unixODBC-devel.i686

Create a recovery area for backups

I create a recovery area (see the screen shots below) on my backup drive with the following:
cd /bkup
mkdir -p oracle/recovery_area
chown -R oracle:oinstall oracle

The third Step is insall oracle


cd /bkup/database
./runInstaller

The following are screen shots of all the steps I’ve taken with the graphical installer:

If you wanna to take support from Oracle you have to give your mail address which is you already registered on Oracle Support site.
 so I don't fill down Oracle support for this.


At this step we see tree installation options so i wanna create with a configuring database, because i would like to show you how to auto create a database after installation, Also i will show you next post Creating A database using DBCA and manually creating a database.

 Here we go, if you are using desktop choose the first, But i'm installing on REDHAT 6 and 40gb and 2gb RAM on Virtualbox :)


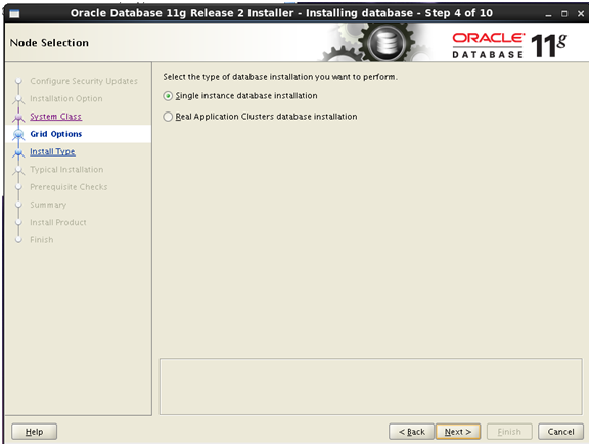
So, if you have RAC system you can follow the second option, But im just installing a single instances.


Typical is the basic optison so i rather go on Advanced install


 Choose your own language


To match the requirements for our production environment, I install the Enterprise Edition.

 
These steps are show you Oracle base path whichs are you wrote in Bash_profile..


This also a directory for files is OraInventory


If you are on Datawarehouse so go on that to create a database.but i used General


I'm always on name ORCL


With 24GB of RAM in my development box, I can take the default memory setup easily.


This is where I choose the UTF8 character set


Here we go again, the important thing is security whatever i will ignore :)


So i dont need any database with sample schemas but i recomend to you use it :)


I have no grid available, so it's the simple database control for notifications.


Our file is system on OS is /u01 


Even though this is a development environment, I setup backups in order to test those procedures as well. This is where I point to the recovery area I setup above.


 Oracle is using, my weak password but it is a strong password none the less (according to many other password checkers).


I use the groups suggested as setup earlier.


 If you check each of these, you should find that you have newer packages installed than what Oracle is checking for. Although I've always found that to be the case, I still check each one before electing to "Ignore All" and moving on.


Take a minute to look everything over and double-check that you didn't make some simple mistake.


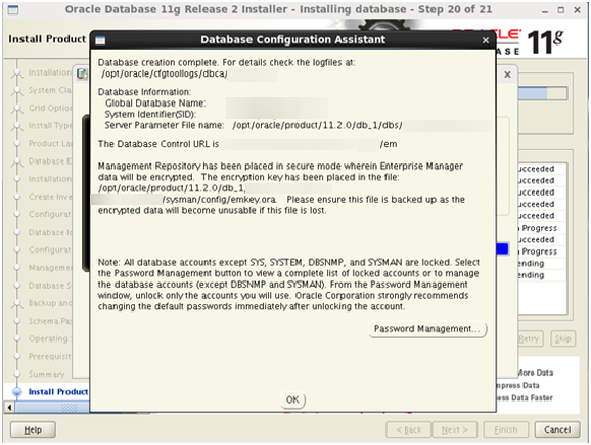
Make note of the URL for the Enterprise Manager and move on…..almost done!


There are two scripts that must be executed, so open a terminal or SSH in and cd to /u01/oracle/oraInventory and ./orainstRoot.sh, then cd /opt/oracle/product/11.2.0/db_1 and ./root.sh. Once these have been executed, click Ok.


Congratulations! Time to "get back to work!" :) 


Friday, January 4, 2013

Oracle Data Pump (expdp and impdp)

At this Article I will present Datapump (Export/ Import) tools.

Datapump help us to migrate Oracle data for copying to a new database after an upgrade or creating a backup.
Lets start step by step example
First of all the user have some privileges to use datapump tools.


Now create a backup location

SQL> create or replace directory dp_vey_dir as '/u01/backups/datapump';


Give privilege

SQL> grant read, write on directory dp_vey_dir to veysi;

Now use the tools
Full Export
For full export the user must have
EXP_FULL_DATABASE privileges

$ expdp user/password DIRECTORY=backup DUMPFILE=full_backup.dmp FULL=y LOGFILE=full_export.log

For example
$ expdp veysi/veysi DIRECTORY=dp_vey_dir DUMPFILE=Full_vey1.dmp FULL=y LOGFILE=full_vey1.log

Schema Export

$ expdp user /password DIRECTORY=backup DUMPFILE=schema_backup.dmp SCHEMAS=schema1,schema2

For example:
$  expdp veysi/veysi schemas=veysi DIRECTORY=dp_vey_dir DUMPFILE=Vey1.dmp LOGFILE=expdpvey1.log


Table Export
  
For example
$  expdp veysi/veysi tables=tbl_v_students DIRECTORY=dp_vey_dir DUMPFILE=Vey.dmp LOGFILE=expdpvey.log

Full Import
After Exporting we need to import. For that the user need IMP_FULL_DATABASE privileges.

$ impdp user/password DIRECTORY=backup DUMPFILE=full_backup.dmp FULL=y LOGFILE=full_import.log

For example

$ impdp veysi/veysi DIRECTORY=dp_vey_dir DUMPFILE=Full_vey1.dmp FULL=y LOGFILE=full_vey1.log

Schema Import

$  impdp veysi/veysi schemas=veysi DIRECTORY=dp_vey_dir DUMPFILE=Vey1.dmp LOGFILE=impdpvey1.log

Table Import


$  impdp veysi/veysi tables=v_tbl_student DIRECTORY=dp_vey_dir DUMPFILE=Vey.dmp LOGFILE=impdpvey.log

Thursday, January 3, 2013

Oracle dblink

Using Dblink to connect to other database
Dblink, is bridge to connected databases.

Creating:

CREATE [PUBLIC] [PRIVATE][SHARED]DATABASE LINK dblink_name
Connect to target_user_name,
İdentified by Target_user_password
USING ’tns_name’;

For example:
CREATE SHARED PUBLIC DATABASE LINK veysi_lnk
CONNECT TO scott IDENTIFIED BY tiger
AUTHENTICATED BY sec_usr IDENTIFIED BY sec_pass
USING 'DB_ORCL';

If we want to create dblink we have to have some privileges such as:
  CREATE DATABASE LINK ,  CREATE PUBLIC DATABASE LINK

Also we can create dblink by Current user . Current user, should be the same with Remote database user and dblink user. That’s why user should be global

CREATE PUBLIC DATABASE LINK remote_connect
CONNECT TO CURRENT_USER
USING ‘DB_ORCL’;

For example:
CREATE PRIVATE DATABASE LINK remote_connect
CONNECT  TO veysi IDENTIFIED BY veysi
USING ‘DB_ORCL’;


Check your tnsname.ora :
DB_ORCL = (DESCRIPTION = (ADDRESS =
             (PROTOCOL = TCP) (Host = dborcl.localdomain) (Port = 1521))
             (CONNECT_DATA = (SID = db_orcl) (GLOBAL_NAME = db_orcl.localdomain.com)
             (SERVER = DEDICATED)))

When creating Dblink is requisite GLOBAL_NAME

So check your global name

SQL>SELECT GLOBAL_NAME FROM GLOBAL_NAME;

GLOBAL_NAME
-----------
db_orcl.localdomain


Now creating by global_name dblink;
CREATE PUBLIC DATABASE LINK db_orcl.localdomain
CONNECT  TO VEYSI IDENTIFIED BY  VEYSI
USING ‘DB_ORCL’;

Creating a view;
CREATE VIEW vw_emp_orcl
AS
SELECT * FROM employees@db_orcl.localdomain.com;


Or creating a table;
CREATE TABLE tbl_vey_emp_orcl
AS
SELECT * FROM employees@db_orcl.localdomain.com;


Updating

UPDATE employees@remote_connect
   SET salary=salary*1.1
   WHERE last_name = 'AYSE';


INSERTING
Kullanımı:
INSERT INTO employees@remote_connect(salary)
VALUES(salary*1.1);
   WHERE last_name = 'AYSE';

DELETING 
DELETE FROM employees@remote_connect ;
   WHERE employee_id = 150;


SELECT:

SELECT * from  employees@remote_connect ;


Looking at DBLINKS

SELECT * FROM all_db_links ;

or

SELECT * FROM dba_db_links; 

Dropping

DROP DATABASE LINK dblink_name


To close Dblink

ALTER SESSION CLOSE DATABASE LINK remote_connect;


Wednesday, November 7, 2012

Oracle Rename User

This article present easy way to change/rename User name and password.

Select FOR your users

SQL> select user#,name from user$;
Update user name
SQL>update user$ set name=’TESTUSER’ where name=’VEYSI’;
SQL>commit;
Close your database
SQL>shutdown immediate;
SQL>startup;

SQL> alter user TESTUSER identified by TESTUSER;

Oracle rename data file tips

This article present easy way to change/rename datafile_name or Tablespace name_name.
First select your dba_datafile_name and choose a file for renaming.
SQL> SELECT FILE_NAME FROM DBA_DATA_FILES;
 
FILE_NAME
--------------------------------------------------------------------------------
/u01/app/oracle/oradata/orcl/users01.dbf
/u01/app/oracle/oradata/orcl/undotbs01.dbf
/u01/app/oracle/oradata/orcl/sysaux01.dbf
/u01/app/oracle/oradata/orcl/system01.dbf
/u01/app/oracle/oradata/orcl/test01.dbf
 

Now close your database;

 
SQL>shutdown immediate;
Now change the name of file
linux> mv /u01/app/oracle/oradata/orcl/test01.dbf ' '/u01/app/oracle/oradata/orcl/veysi01.dbf


Mount your database


SQL> Startup  mount;


Rename datafile


SQL>ALTER DATABASE   
RENAME file      
   '/u01/app/oracle/oradata/orcl/test01.dbf' 
TO 
   '/u01/app/oracle/oradata/veysi01.dbf'

sql>alter database open;

Renaming Tablespace

ALTER TABLESPACE TEST RENAME TO INTERBASE;